Wednesday, March 20, 2019

coastal alley s a l e {may}


Tuesday, March 19, 2019

march adventure

I'm actually still in my February adventure {painting class}... And it's going so strong! But, I'm gearing up for a small March adventure. Of course I want to go guns a blazing and sign up for anything and everything from the left to the right, but I need more time in my day plus a deeper wallet! Ha Ha Being a single mom with 2 kids who have  after school sports and a social life. I can't do it all. I need to pick and choose what I want to do for me when I get an opportunity. Right before every painting class I actually get a ping of guilt/anxiety because its 3 hours of "ME" time. I feel I need to be working, making phone calls or doing something in my office. My mind automatically says... You shouldn't be focusing on you. Well, I shifted my mind and said, you know what this makes "ME" happy... No one is going to die if I don't talk to them on a Wednesday morning, my office will still be there when I get back... And if a client can't wait then {truth} they're not the clients for me. Thank God I adore my clients and they adore me {hopefully... wink, wink}. I've noticed I'm happier when I come home from class and I enjoy working in my office and being around my kids more. Who would of thought this "ME" thing could change "ME"... 

So my March adventure is a cooking class. Nothing fancy... But definitely fun and exciting for "ME". Something creative and refreshing in my mind. So if you're doing a monthly adventure... Do it for you and no one else! If someone laughs at you for what you're doing... Smile and walk away. Because guess what, you know they wish they could do what you're doing! I guarantee it! 

What's your March adventure? 

Monday, March 18, 2019

monday {menu}

 {recipe from... h e r e}

Homemade Cronuts with Lemon Glaze

Dough Ingredients:

  • 1 cup milk
  • 1/3 cup water
  • 1/4 cup + 1 Tablespoon sugar, divided
  • 1 active yeast package
  • 250 grams (~1 1/2 cup + 2 Tablespoons) all-purpose flour
  • 250 grams (~1 1/2 cup + 2 Tablespoons) bread flour
  • 1 Tablespoon salt

Butter Block Ingredients:

  • 1 cup unsalted butter, cool to touch
  • 1/2 cup all purpose flour

Glaze Ingredients:

  • 1 1/4 cups powder sugar
  • 2 Tablespoons milk
  • 1 Tablespoon lemon juice
  • Zest of 1 lemon
  • 1/2 teaspoon vanilla

Instructions:

  1. MAKE THE DOUGH: In a small bowl or large pyrex, combine the milk and water, and microwave until the temperature is 105-115 degrees F. Stir in 1 Tablespoon sugar. Sprinkle the yeast on top. Let sit for 5 minutes until foamy. (When the sugar and yeast react together, gas bubbles are released thus creating foam, and the mixture will smell of bread. If you do not see any reaction after 5 minutes, your yeast could be bad and you will need to start over.)
  2. In a standing mixer fitted with a dough hook, combine the flours, 1/4 cup sugar, and salt. Make a well in the middle. Pour into it the yeast mixture.
  3. Mix on low until it comes together into a ball (~2 minutes).
  4. Increase the speed to medium and kneed for another 5 minutes. Take the butter out of the refrigerator and set aside. Check the consistency of the dough by gently poking it with your finger. The dough is ready when it does not stick to your finger. However, if the dough sticks to your finger, add more all purpose flour, 1 Tablespoon at a time, kneeding briefly after each addition. (*)
  5. Tip the dough onto a lightly flour surface. Form the dough into a ball, then transfer to a large, lightly oiled bowl. Cover the bowl with plastic wrap. Refrigerate for 1 hour. As you wait, make the butter block.
  6. MAKE THE BUTTER BLOCK: Clean your standing mixer bowl, and switch out the dough hook attachment for the paddle attachment. In the standing mixer on low-medium speed, beat the butter and 1/2 cup all purpose flour until smooth. Do not beat on high speed as you do not want to incorporate air into the butter.
  7. Lay a large piece of plastic wrap on the counter. Lightly sprinkle with flour. Transfer the butter onto the middle of the plastic wrap. Fold over half of the plastic wrap, as if you were closing a book, creating a flat edge of butter along the fold. Use your hands to gently spread the softened butter into a 7" square. Fold over the 3 other sides to enclose the butter. Transfer to a flat surface, such as a small cutting board. Refrigerate until ready to use.
  8. Transfer the dough to a lightly floured surface. Use a paper towel to gently soak up any extra oil from the dough. Roll the dough into a 10" square. Place the butter block in the middle of the square, like a diamond.
  9. Cut halfway through the dough at the butter's edges. Roll out the "cut" corners 1-2 times, until long enough to cover the butter when folded.
  10. Stretch and fold the dough edges over the butter, and pinch the edges together where they meet on the sides and in the middle.
  11. Flip the dough over and position it so it looks like a square instead of a diamond. Using a rolling pin, firmly press down along the dough, creating wavy indentations (*). Roll into a 10"x20" rectangle, with the short end facing you. Along the way, ensure that the dough is not sticking to the surface underneath by adding a light sprinkle of flour as needed.
  12. Use a dry brush to get rid of excess flour. Fold the bottom third of the dough up, brush off excess flour, then fold the top third of the dough dough, again brushing away excess flour. Pinch the sides together. Turn the dough 90 degrees so that the open edge or flap is on the right, like a book. Transfer to a small baking sheet, wrap in plastic wrap, and refrigerate for 1 hour. This was your first turn.
  13. Do the second turn: remove the dough from the refrigerator, and return to your lightly floured surface. Position the dough as it was, with the flap on the right like a book ready to be opened. Roll the dough into a 10"x20" rectangle, with the short side facing you. Brush away the excess flour. Fold the bottom third up, and the top third down, brushing away the excess flour in between. Turn the dough 90 degrees, so that the flap is on the right. Return to the baking sheet, cover with plastic wrap, and return to the refrigerator for another hour.
  14. Repeat the above step two more times (for a grand total of 4 turns), but for these turns, roll the dough into a 9"x16" rectangle rather than a 10"x20" rectangle.
  15. After turn #4, refrigerate the dough overnight.
  16. The next day: On a lightly floured surface, roll the dough into a large rectangle, with 1/2" thickness, flipping the dough throughout to get an even roll, and adding a sprinkle of flour with each flip.
  17. Use a donut cookie-cutter (*) to cut out 8 donuts. (Dip the cookie-cutter in flour between each cut to prevent sticking, allowing for easy release). Gently transfer to a parchment lined baking sheet, placing 2" apart.
  18. Using a 1" cookie-cutter or a piping tip, cut out donut holes from the remaining dough. (Again, dip the cookie-cutter in flour between each cut to prevent sticking). Transfer the donut holes to a second parchment paper lined baking sheet. Cover both baking sheets with plastic wrap, and refrigerate for 2-3 hours.
  19. DEEP FRY: In a large saucepan, heat 2 1/2" - 3" of oil until it is 350F. (*) Using a spider whisk, gently place the donuts into the oil. Fry for ~1 1/2 minutes on each side. Only fry up to 3 donuts at a time.
  20. Once done, transfer the donuts onto a cooking rack heavily lined with paper towels. Fry the remaining donuts and donut holes.
  21. Once the donuts are cool enough to handle, roll the donuts in sugar, covering completely.
  22. MAKE THE GLAZE: Whisk all of the ingredients together in a small bowl. Drizzle the glaze over the top of the donuts and donut holes.
  23. Donuts are best the same day. Otherwise, store donuts, covered, in the refrigerator up to a few days.

Sunday, March 17, 2019

happy sunday...


Wednesday, March 13, 2019

painting class


Well, my painting class is still going strong... And I'm loving it. I actually thought last Wednesday was my last class. Nope I have 2 more times! I can't even tell you have happy I am with myself that I signed up for this class. Its been absolutely perfect! I've realized sometimes we need to try new things and push ourselves to do something either we "t h i n k" we don't have time for or we "t h i n k" we can't do. Truth, I'm not an artist {drawer}. Yes, I'm very creative, but I can't draw to save my life. haha I know that might sound weird, but it is very very true... I've never had gracious drawing skills. I have to work on it when I'm designing. I can sketch or as I call it balloon sketching my ideas to clients. It gets the message across just perfectly and they see mu vision very well! So when I sit in this class every Wednesday I put my headphones on... Pump up the volume to a line up of motivational speech... Concentrate on what I'm doing... And enjoy the journey! Try it... I promise you you'll love it too! 


So what do you want to do this month or next? Write it down and then do it!
 Please share your journey!

Tuesday, March 12, 2019

family time

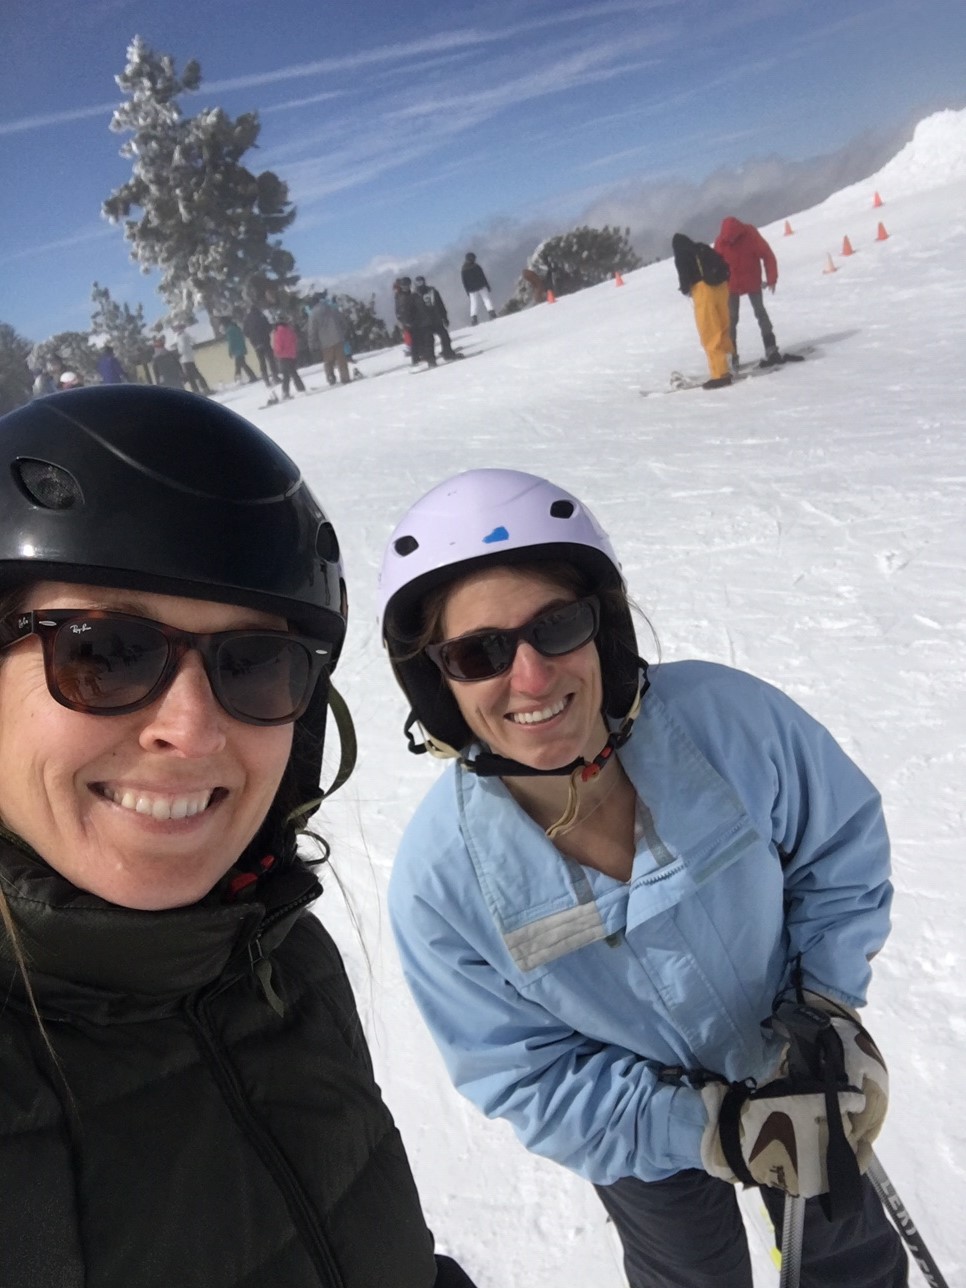
Sometimes, we all need to just get away and enjoy our family... Especially when its a certain someones birthday! The top dog... My mom! She chose to go up to Lake Arrowhead and have us all go skiing for her birthday. No joke we had a blast! 

We lit birthday candles in a little pink box in the lobby of the hotel. We laughed and ate cake till we were all sick and in a food coma. No fancy plates... Nothing! Now that's a birthday we all will remember forever! With the ones we love...

Being up in Lake Arrowhead brought back a lot of memories for me... As a child my brother and I would go up to Big Bear to go skiing at Snow Summit every weekend with a ski group called Blizzard. Rise and Shine every Saturday... 5:00am at the Gelsons Parking lot. No joke it was amazing until I hated getting up that early and so no more mom!  My brother on the other hand  was obsessed with Skiing. No joke obsessed! I do have to say, we really did have fun and I learned so much with that group... Sorry to report I'm not a hot dog skier, but man I sure know how to get down that mountain fast! lol

Watching my little's ski with me and my brother, was amazing! I felt a sense of peace on this trip... Weird I know, But having us all together for my moms birthday and having fun on the slops really did it for me. Kind of like an out of body experience... Like I was watching a cool adventure happen in front of me. I kept asking myself... Look how blessed I am! I have both my babies with me, with my family. I am so lucky in life! Thank you, Thank you, Thank you! We are all having fun and enjoying ourselves. No one was fighting... Encouragment was high on the list with each other. I listened to my brother help my kids and teach them things that I couldn't teach them. My brother did it in a fatherly way... They need that help and male guidance. They need to see a male figure that is kind and respectful to them. That sent chills down my spine with joy and yes I did shed a few tears as I was skiing. For the first time in a long time I relaxed and said, everything is all good and still kept saying, Thank You! Thank You! Thank You!    


Well, sometimes you just need to get away and have family time and look at the bigger picture in life... If you relax in life you can see a plan is forming and everything is all good!  I am so blessed to have the family I have. I love them with all my heart... I can't wait for the next adventure with them! I'll keep you post... Happy Tuesday! 


Monday, March 11, 2019

monday {menu}

K E T O   B R E A D S T I C K S
{recipe from... here}


  • ingredients: 
  • 1 1/2 cups part skim low moisture shredded mozzarella cheese
  • 1 oz cream cheese
  • 1/2 cup almond flour
  • 3 tbsp coconut flour
  • 1 large egg

toppings:

  • 1/2 cup part skim low moisture shredded mozzarella cheese
  • 1/3 cup shredded parmesan cheese
  • 1 tsp finely chopped parsley

directions:

  1. Preheat oven to 425°F.
  2. Add mozzarella and cream cheese to a large microwave-safe bowl. Melt in the microwave at full power in 30-second intervals. After each 30 seconds, stir cheese until cheese is completely melted and uniform (see photo above). This should take around 1-1 1/2 minutes total. Do not try to microwave the full time at once because some of the cheese will overcook. You can also melt the cheese over the stove in a double boiler.
  3. Add cheese ball to a food processor with dough blade attachment. Add in almond flour, coconut flour and egg. Pulse on high speed until the dough is uniform. The dough will be quite sticky, which is normal.
  4. Allow the dough to cool slightly, which will also make it less sticky and easier to work with. Roll the dough out between two sheets of parchment paper until 1/4 inch thick. Peel top sheet of parchment paper off of dough. Move the dough (still on the bottom parchment paper) onto a baking sheet.
  5. Spread 1/4 cup of mozzarella cheese over the dough, leaving a 1/2 inch perimeter. Bake for about 5-6 minutes, or until edges of the dough are golden and puffy.
  6. Evenly sprinkle the surface of dough with remaining mozzarella cheese and parmesan cheese, leaving a 1/2 inch perimeter. Bake for 3-5 more minutes or until cheese is melted. Garnish with parsley before serving.

notes:

  • I recommend using a food processor to make the dough because the dough is quite sticky so it's hard to mix by hand.
  • Because the dough is sticky it's important to use parchment paper to roll out it as detailed in the instructions.
  • This recipe calls for both almond and coconut flour because the coconut flour helps absorb the liquid and the almond flour keeps the dough from being too sweet.

Sunday, March 3, 2019

happy sunday...


Friday, March 1, 2019

book # 3 {march 2019}


Book # 3... In march is {my pick}... So for March the book will be... St. Agnes' Stand, by Tom Eidson.  I bet you all are reading this name and saying... Hmmm where have I heard that name before?! OK Truth it's my Uncles Toms book {my moms brother}. I have a little confession... I have read bits and pieces of it. I was young when he wrote it... So a bazillion years later the guilt really is kicking in and I must read it to be able to sit at my uncles kitchen table ever again! lol The guilt of all the lies of saying I 100% completed the book is too hard to bare anymore. I can't even tell you how many times I got up to use the bathroom while the family discussed it. Too many to count! I'm such a bad niece! But on the flip side... I'm making amends and going to read it from start to finish! And yes I will call my Uncle after and tell him the truth.  So rustic rooster book club readers get reading! This one I need us all to discuss together right after!!!!!